How to use Team Workspaces in RankedVote
Team Workspaces allow you to invite others to work with you on your contests, decisions, and elections. Similar to how you work with a shared folder on Google Drive, Team Workspaces allows multiple RankedVote users to access and edit the same information.
Potential Uses
Team Workspaces are great for...
- Departments within a company: Marketing, product development, HR, recruiting...you name it...can all create their own spaces to collaborate on contests and decisions. No single person has to be the gatekeeper. Impactful uses include strategic project prioritization, intern demo day winner selection, and corporate philanthropy selection.
- Voter education teams within a City or State Government: Allow different departments and stakeholders to stay in the loop, have the latest data, and even create their own outreach.
- Any time it's more than just a single person managing a contest: To state the obvious, if there's reason to have more than just you creating the contest, managing it while it's running, or analyzing the results and data...then a Team Workspace is the way to go.
Follow the walkthrough below to see exactly how to create your Team and start collaborating👇
Step-by-Step Walkthrough
Add a Team Workspace
When you log in to RankedVote, you land on the Dashboard page of the last workspace you were in. For most people, that's the individual workspace that's automatically created when you first sign up for RankedVote. To create a team workspace, you'll need to go to the "Manage Workspace" page.
The Manage Workspace page can be found through the upper left "Workspace Switcher" menu. It can also be accessed from the Workspace section of the main menu (just click the account icon in the upper right).
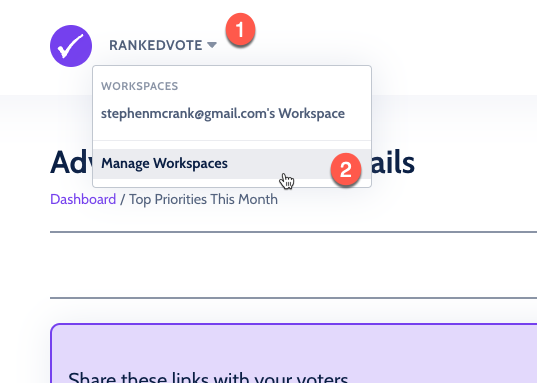
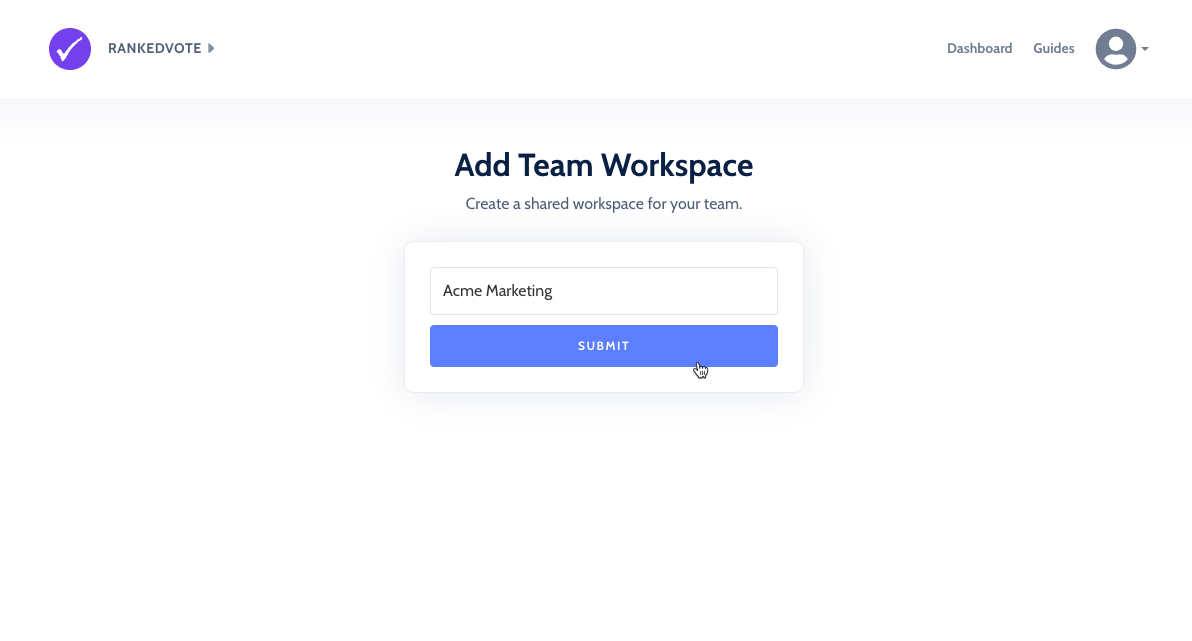
On the Manage Workspace page, click the big blue "Add" button at the top of the page. Once you've given your team workspace a name, you're ready to start.
Note: If the button says "Verify Email," you'll need to follow those steps before you're able to create a Team Workspace.
Upgrading the Workspace to a Team Plan
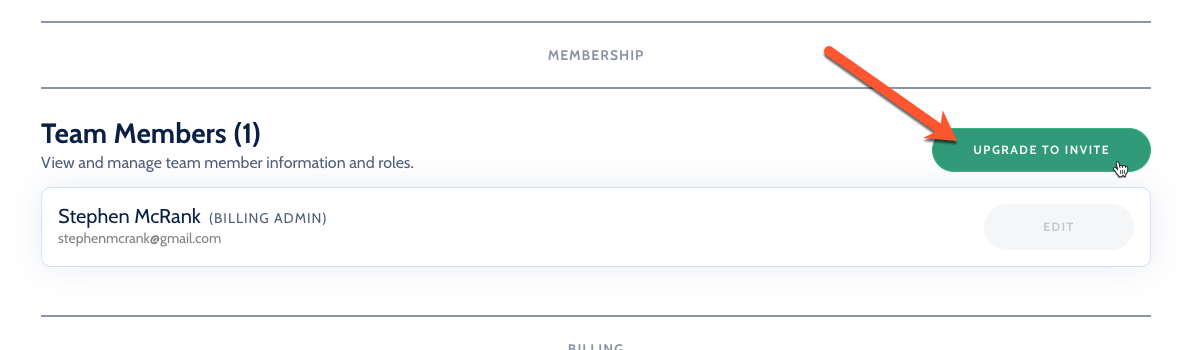
Before you're allowed to invite others or take advantage of any of the unique features of the workspace, you'll need an active Team subscription. Any team member you add is effectively getting access to a Premium Account and unlocked Chrome Extension ($70/month value).
Once you've successfully subscribed, all Team Features are unlocked.
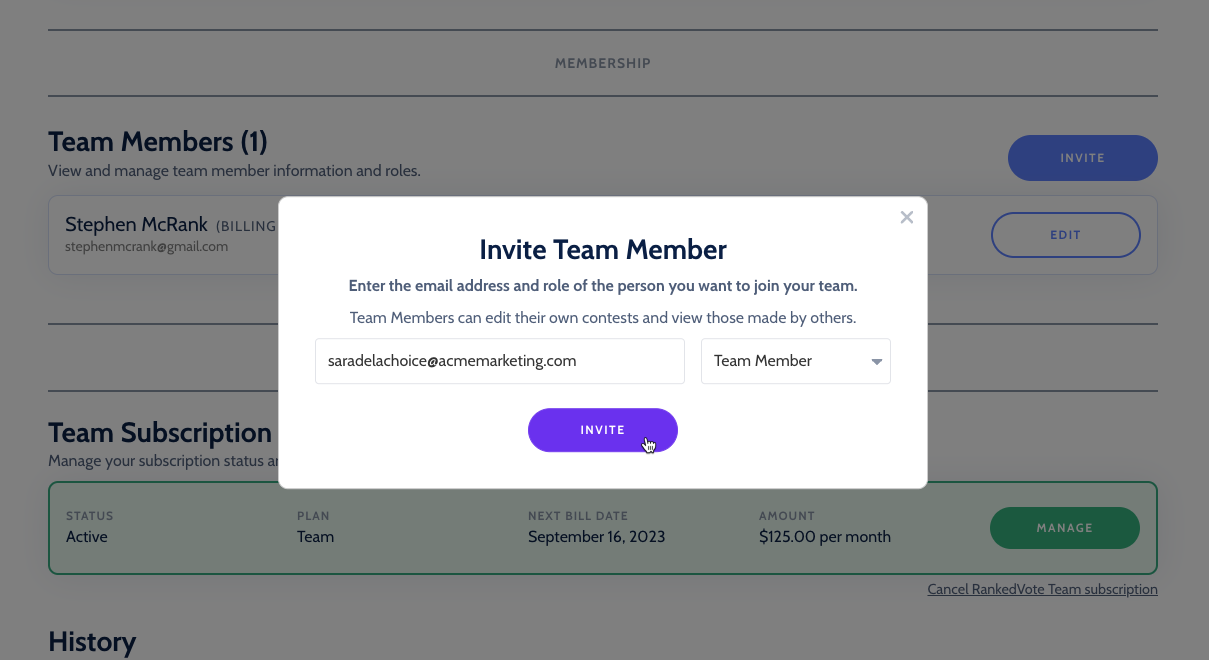
Inviting Team Members
It's not a team without other people! To invite others, click the big blue "Invite" button, enter in the invitee's email address, and select the invitee's role.
For team members that are new to RankedVote, they'll need to sign up using the exact same email address that you enter. For team members that already have RankedVote accounts, you'll need to enter the exact email address they created their accounts with in order for them to see the invitation to join your team workspace.
Once sent, the invite will show in the "Pending Invites" area. If you made a mistake, you can remove the invite. And, if the invitee lost the invite in their inbox, you can resend it.
Managing Team Member Roles
Over time, you may want to adjust what each team member can do. As long as you're a Team or Billing Admin, you can handle that by clicking "Edit" on any of the team members in the Membership section, selecting "Change Role" and selecting the desired role from the dropdown (don't forget to click "Save"). Here's the rundown on what each role means:
Roles
A role determines what a user can see and do within a team workspace.
- Team Member: Able to view any contests created by the team and download ballot data CSVs. Can create and edit their own contests. Cannot edit contests created by others. Cannot invite other team members.
- Team Admin: Able to view and edit any contest created in the team as well as invite team members and manage roles.
- Billing Admin: Just like Team Admin, but with the additional ability to manage the subscription, view invoices, and make plan adjustments.
Note: All teams must have at least one billing admin. And, you can't remove yourself from a team.

Customizing Base URL
Team Plans also give you the ability to deeply customize the URL that's used for the contests that you create. By default, contests in RankedVote are reached by going to a URL like https://app.rankedvote.co/rv/nsxqnxeoyrry1tsgr4/vote. With a Team Plan, you can customize the "rv" part.
When combined with the ability to customize the "nsxqnxeoyrry1tsgr4" part on the individual contests, you now have the ability to create Vote and Results links that are approachable, memorable, and on-brand (e.g. https://app.rankedvote.co/acme/next-quarter-priorities/vote).

Note: 1) You can't change your Base URL once set, so make sure you're happy with it. 2) It only impacts contests that are created after the Base URL is set. This is to make sure links to existing contests that you may have shared don't break.